One common form of astrophotography is to use a high frame rate camera to produce a video of an object then stack (process) the frames to compile together the clearest parts to produce one (hopefully!) crisp image. This is a particularly useful technique for solar system objects, such as the moon and planets.
Previously I had used a Netbook running Windows 7 and a ZWO ASI120MC astro-camera, but as age set in, the cheap little netbook started to struggle for battery life, updates were no longer available and it came time to look for a replacement. Unfortunately due to the success of the tablet market, nobody makes cheap little laptops any more, so a dedicated imaging laptop was going to get expensive.
Imaging with a laptop in the garden on cold winter nights also presents problems in that you need somewhere to stand it, like a table. So, I started to wonder, could I replace the laptop with a Raspberry Pi? Looking at what I had, I had a USB high frame rate camera, a beefy Celestron power tank, Celestron telescope and a phone/iPad. If I could use a Pi to run the camera, power it from the power tank then use the long battery and high res screen on an iPad, it would make a cheap, lightweight imaging set up, which would also give the option of imaging from inside once set up.
Would such a thing be possible? Yes, it turns out loads of people have done this. Also using the Pi gives the option for telescope control and to use the GPIO header for additional devices, such as focus control or activating dew heaters. The Pi 4 is a reasonably powerful device, with a 1.5 GHz quad core CPU, 4 Gb RAM and USB 3, it easily outstrips my old netbook with a single core 1.33 GHz processor, 1 Gb RAM and a pair of USB 2 ports.
Below is the first in a series of blog posts covering how I built my astro-imaging rig as I set out to achieve the below objectives. All code, schematics and 3d print objects developed for this project are available in this GitHub repository.
| Objective | Essential? | Complete? |
|---|---|---|
| Raspberry Pi with remote desktop from iPad | Essential | Completed, using Astroberry |
| ZWO ASI120MC camera support and imaging application | Essential | Completed, using FireCapture |
| Powered from power tank | Essential | Completed |
| Wireless and hotspot mode | Essential | Completed using Astroberry |
| Stellarium or other planetarium software | Desirable | Completed |
| Telescope remote control | Essential | Completed, usingKStars & INDI in part 2 |
| Support for an external disk | Essential | Complete – just plug one in! |
| Focus remote control | Desirable | Completed, part 3 |
| Small screen to show network status | Desirable | Completed, see below |
| Control and preview of Canon DSLR | Desirable | Completed, part 4 |
| Auto-guiding Skyadventurer mount | Desirable | |
| Build & Casing | Essential | Completed *link* |
Part 1 – System setup
The first part covers the system basics, install, drivers, power and helpful admin tools. The steps were not taken in this order, lets face it, getting images up on the screen is far more exciting than some of the background work!
Server Options
The premium option for imaging using a Pi, is using the ZWO ASIAir Pro, this looks like an excellent piece of kit, with very good reviews, but with a price tag around £300, it is an expensive way to buy a Pi, and limits the choice of customisation.
Initially I set out to do all this myself from scratch using the standard Raspian install, however the first time I started to search for drivers, I discovered two existing projects, Astroberry and Stellarmate. Stellarmate looked good, is supported and well packaged, but comes with a £50 cost. Astroberry is free. Comparisons say it is not quite as well polished as Stellarmate and sometimes is not updated as often, but it is good for people who know how to run a Pi or Linux device. I opted for the free Astroberry.
Astroberry setup
Getting Astroberry up and running was quick and simple. I found this quickly solved the first few objectives to get the Pi up and running, allow remote access from an iPad and linux desktop, with the ability to run in a hotspot mode.
- Follow the instructions at https://www.astroberry.io/docs/index.php?title=Astroberry_Server, in the quick start section. Any problems connecting remotely, plug it into a screen and then configure wireless networking.
- Once running, install RealVNC Viewer and connect by either finding the IP address from your router or using ‘astroberry.local’ and the default password ‘astroberry’.
- If this fails, try pointing a browser to https://astroberry.local.
- Perform system updates (
apt update && apt upgrade) - The Raspberry Pi Configuration tool should start by default, if not run this from the startup menus.
- Leave most settings as default
- Consider changing the name
- Do change the password from the default
- Set your timezone and keyboard in Localisation
- If needed, change the resolution under the Display tab
- Before you reboot, click VNC Server in the top right and also change the default password here.
- Ensure the file system fills the card by running
lsblk- If not
sudo raspi-config, Advanced and Expand Filesystem
- If not
Screen resolution and iPad support
Screen resolution can be changed from Preferences->Screen Configuration, however none of the default modes are iPad friendly. They look great on a 1080p monitor and fill the whole screen, however when using the iPad VNC app, you can not view the whole screen at one.
For reference, a 1080p monitor is 1920×1080, a lower resolution laptop screen is typically 1366×768, but an iPad 5th generation is a much larger 2048×1536, with a 4:3 aspect ratio.
Commenting out dtoverlay=vc4-fkms-v3d in /boot/config.txt gives better performance for Firecapture. Do this, then use raspi-config to pick a 4:3 mode and reboot.
Camera support and imaging
My camera is the older version of the ZWO ASI120MC, supporting only USB2.0, and is known to be problematic under Linux. Astroberry comes with a few imaging applications installed, including FireCapture and oacapture. Both detected the camera, but failed to produce an image. With help from the INDI forums, I was able to finally get it running. (INDI is the underlying software control system, used to connect many types of astronomy software)
Other newer cameras should connect and be detected straight away and not require the following steps.
sudo rpi-eeeprom-update- If this is the latest then it will cause a problem
- See https://indilib.org/forum/general/7656-solution-for-usb-2-0-camera-and-usb-hub.html
- Prevent auto-updating of firmware with:
sudo systemctl mask rpi-eeprom-update- edit /etc/default/rpi-eeprom-update to:
FIRMWARE_RELEASE_STATUS="stable" - Downgrade the firmware following:
https://www.raspberrypi.org/forums/viewtopic.php?f=28&t=250990
$ unzip vl805_update_0137ab.zip
$ chmod a+x vl805
$ sudo ./vl805 -w vl805_fw_0137ab.bin
$ sudo reboot- Verify on reboot:
$ sudo rpi-eeprom-update
BCM2711 detected
Dedicated VL805 EEPROM detected
*** UPDATE AVAILABLE ***
BOOTLOADER: update available
CURRENT: Thu 3 Sep 12:11:43 UTC 2020 (1599135103)
LATEST: Fri 11 Dec 11:15:17 UTC 2020 (1607685317)
FW DIR: /lib/firmware/raspberrypi/bootloader/stable
VL805: update available
CURRENT: 000137ab
LATEST: 000138a1- Downgrade ASI firmware, Windows is required
- Download the firmware upgrade tool from https://astronomy-imaging-camera.com/software-drivers
- Select the file with the -compatible filename
- Upgrade
- In KStars, EKOS, Camera -> Controls, set the format to Raw 8 Bit and turn streaming on, you should see an image.
- Do you see monochrome with ‘graph paper’ overlay?
- Under FireCapture, enable colour with the Debayer function.
- In oaCapture settings:
- Camera: force frame formet to RGGB8
- Demosaic: Demosaic preview and output data, set Bayer format to auto or GRGB8
- You may have to reset the camera or disconnect – connect.
To use, see First Light……** LINK REQUIRED **
Displaying the IP address / Hotspot mode
It would be useful if on boot, we could see what IP address the Pi had and if it had connected to the wireless network, or was running in hotspot mode. Otherwise it is just a box in unknown status.
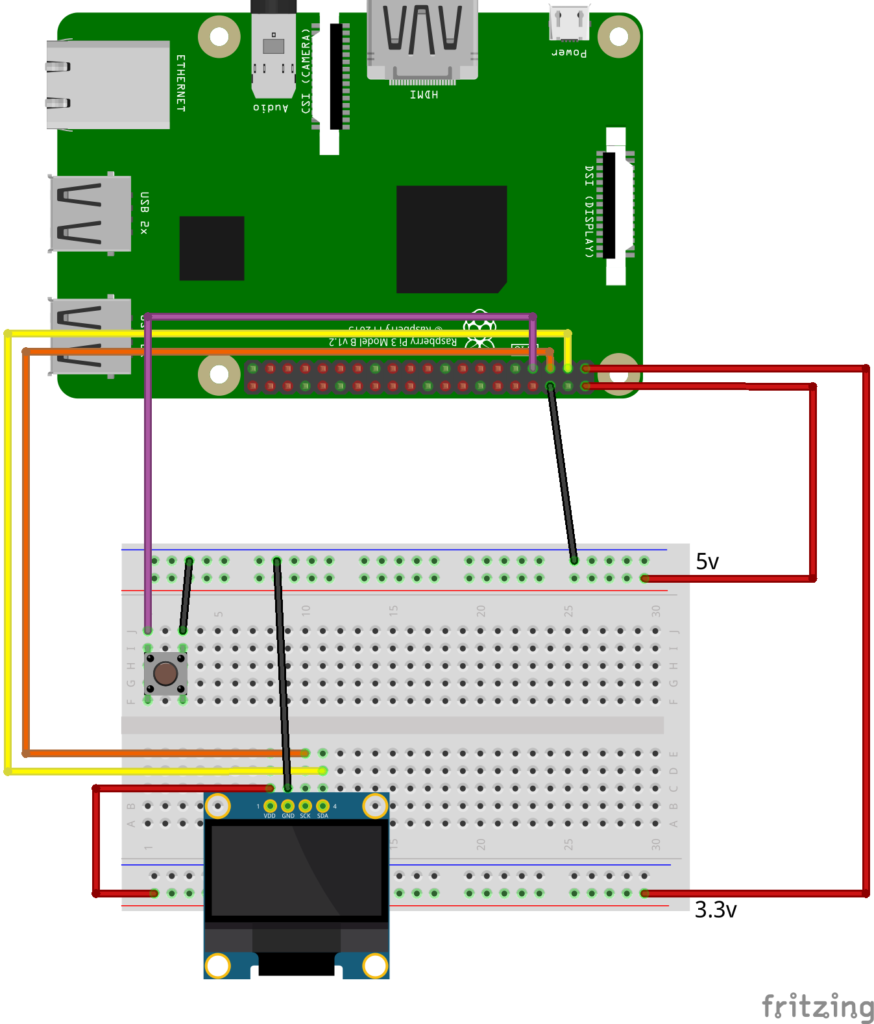
SDD1306 0.96″ OLED screens are usually well under £5 and can be a quick and simple screen to show small amounts of output. They connect directly to the GPIO header, using I2C (make sure you buy the I2C version, not SPI). They come with 4 pins and are connected as follows:
| SDD1306 | Raspberry Pi |
|---|---|
| GND | GPIO pin 9 (GND) |
| VDD | GPIO pin 1 (3v3) |
| SCK (or SCL) | GPIO pin 5 (GPIO 3 / SCL) |
| SDA | GPIO pin 3 (GPIO2 / SDA) |
We don’t want the screen on all the time, so a wake up push button would be useful. As GPIO 4 (pin 7) is free in a gap between that and ground, it makes a useful block of 5 pins together to use.
Install the python dependencies by following the steps at https://learn.adafruit.com/adafruit-pioled-128×32-mini-oled-for-raspberry-pi/usage.
sudo pip3 install adafruit-circuitpython-ssd1306
sudo apt-get install python3-pil
Download and run the stat example program to test the screen. Line 42 defines the screen as 128×32 resolution. If you have a 128×64 screen, this gives a large display with line gaps between, much like some 1980s monitors. Change the value to 64 to only use half the screen but look a lot nicer.
Check out the repository onto the Pi, the status display program is called wifiStatus.py. Add the following line to /etc/rc.local:
/usr/bin/python3 /home/astroberry/display/wifiStatus.py &
Reboot and on boot, the screen should show for 20 seconds, displaying the network status. To view again, press the button.
Hotspot mode
If the configured wireless network is not available, Astroberry will revert to hotspot mode, acting as a wireless access point. If the device is out in the field and the home network can not be seen, this is how you will be able to access it. To simulate this, edit /etc/NetworkManager/system-connections/Wi-Fi.nmconnection and change your home SSID subtly. On reboot, the Pi should start in hotspot mode, as indicated on the screen.
By default, in hotspot mode, the IP address will be 10.42.0.1.
If you are on a home network but have a weak signal, you may get performance issues when connecting. There is a script in my GitHub repository, called hotspot.sh. This must be run as root (sudo) with the parameter ‘on’ or ‘off’ to switch between modes.
Powering the Pi
The recommended power supply for the Rasbperry Pi 4 is 5v and 3A. However, while the Celestron Power Tank has USB power outputs, these are only rated at 1.5A. Trying this, it will power the Pi and it does seem to run with the camera. However it is well known that most random problems with the Raspberry Pi are due to faulty or under rated power. If we are going to power this from a battery, we need something beefier.
The Power Tank has two 12v 10A car cigarette lighter style outputs, one of which I use for the telescope. There are two options. One is to get a 3A output car charger and power over the standard USB-C power port, or we can bring the 12V right up to the Pi, step it down and it gives us the option of drawing power for other devices. Note, I did not actually use this, see below.
A buck converter such as the KIS3R33S is a reasonably efficient way of stepping 12v down to 5v 3A. Many of these come with USB ports on one end. This can be used with a short cable into the USB-C socket on the Pi, removed completely or I soldered two leads onto the underside of the board, connecting to pins 4 (5v) and 6 (GND) on the 40-pin GPIO header. With a car to 2.1mm x 5.5 mm lead (the type of power connector used on a lot of CCTV cameras) and a matching socket on the input end of the buck converter, this should pack neatly into a case.
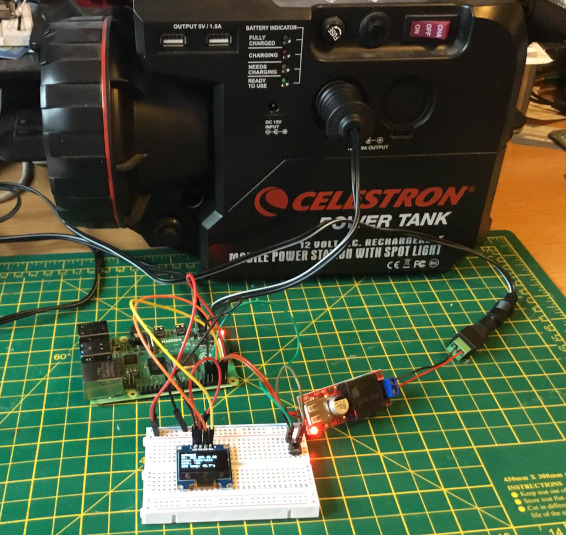
Although this worked fine, I found that once completed and set up outside, I was getting a number of problems using the power tank. It should be able to deliver the required current, but once an external disk, focus stepper motor, a VNC client and a high frame rate camera had all been added, the Pi struggled, reported voltage issues and could not seem to run both the disk and camera together. It also seemed to cause telescope problems, with a flickering display. Some behaviour looked as if there could be some form of shorting going on and I generally was not happy with it. Perhaps the power converter was cheap or faulty?
In the end I bought an Anker PowerCore Essential 20000 power bank. Supplying 20,000mAh and delivering high current with it’s fast charge socket it could handle an external disk, the Pi and the camera without a problem. It does mean using two power supplies, one for the telescope and one for the Pi, but that is not a major issue and increases overall battery life.
That has the Pi up and running with Astroberry and the ability to run from battery with a remote VNC connection. In the next part, I use Astroberry to control my telescope.
Comments