All code in this example is included in the GitHub repository. As the core libraries are likely to be expanded, an archive of code associated with this blog post is at blogArchive/post3.
The driving test in part 2 worked well, except the Bluetooth range was not far enough and my phone soon lost contact, especially when the rover went into another room. But it still had wifi access, so trying to control it over wifi seems like the next logical step. There are a number of ways to do this, but a web interface is probably the easiest.
Building the main control library
So far, I’ve been repeating the same pwmMotor class in all my examples. No matter what application I produce, it is pretty certain that I’m going to need a class for controlling motors with PWM and a class for controlling the rover, which will contain two pwmMotor objects. To this end, I have created piroverlib.py in the main directory.
This library contains two classes, pwmMotor and piRover. pwmMotor is used by piRover, but it has not been added as an internal class as it may be useful to call it directly, especially if the rover is ever expanded to mow the lawn or any other function that will drive a motor.
pwmMotor:
| Function | Description & Usage |
|---|---|
| init(a, b) | m=pwmMotor(8,9) – Initiates a PWM motor class, giving the two GPIO pins. BCM numbering is used, e.g. GPIO19. |
| stopPWM() | Stop the motor and cease the running pwm object associated. Normally just called internally. |
| stop() | Stops the motor and will cease pwm if running |
| full(sp) | Set the motor to full. If sp is positive the motor runs forward, if negative the motor runs in reverse. The actual value does not matter. |
| setSpeed(sp) | Set the motor speed to sp, where sp is -100 to 100. Negative values run the motor backwards. |
piRover:
| Function | Description & Usage |
|---|---|
| init(<various>) | Initialise a piRover object with a list of possible parameters: name=”string” – Gives the rover a name, default pirover. Used if supporting more than one robot. left=[a,b] – Set left motor with a list of the two GPIO pins right=[a,b] – Set right motor with list of the two GPIO pins load=1 – If the load keyword is used, the current load values are returned wifi=1 – If the wifi keyword is used, the current RSSI and noise values are returned A warning will be given if no left and right motor is given. All other parameters are optional. All functions return all known data, including return from various configured sensors and the current motor speeds. |
| stop() | Stops both motors |
| fwFull(sp) | Both motors forward full if sp is positive, backwards if sp is negative |
| fwSpeed(sp) | Both motors at speed sp, going backwards if this is negative. Speeds are between -100 and 100 |
| drive(l, r) | Set the left and right motor values directly |
| js(x,y) | Gives a joystick x and y position between -100 and 100, then sets the left and right motor accordingly |
| spin(sp) | Spins the rover at speed sp. When positive spin clockwise, setting the left motor forward and the right motor backwards by the same value. Spin anti-clockwise if negative |
| chSpeed(l, r) | Changes to left and right motor speed by the amount given in l & r. Motors will not go outside the -100 to 100 limits. |
| getSensorData() | Return values for all configured sensors |
| readLoad() | Returns the current load value and sets this in the full return data |
| readWifi() | Returns a two unit list containing the RSSI and nose, while also setting this in the full return data |
As a test, in hw_testing, driveTest3.py performs the same functions as driveTest2.py (previous blog post), however this makes use of the library. As a result, it is quite short and just calls the basic drive functions.
Using a processing queue
Generally input from a web page is called on demand, as each click is made. There is no running application, which means we need a background process which will go through all the set up stages for the rover and pass information to it from a web page. Using a fast universal queuing system such as ZeroMQ, we can break the two main functions apart. A backend can monitor and control the rover, being aware of the hardware state. Meanwhile a front end can be web facing and place commands on a queue for the back end to read.
This gives us many advantages. Splitting the front and back end components apart allows us to simplify each code module and it allows them to both be interchangeable. We could use an entirely different front end, perhaps keyboard control. As it makes use of an internal network connection, the front end could be on another network host, perhaps a desktop using a game controller. As there are ZeroMQ libraries for most common languages, the front end could be in a different language or we could swap the back end for a C based server.
To start using ZeroMQ:
- Install with
sudo apt install python3-zmq - Follow the Hello World example at https://zeromq.org/get-started/?language=python&library=pyzmq#
Once ZMQ is working, driveByQueue.py is the main library which I will use for rover development. Supporting a basic language, it takes text commands, passes them to the piroverlib library and passes the return data back to the client. Most future applications will use this, allowing them to put commands on the queue without having to configure direct motor control.
The program set up is as follows:
import time
import zmq
import json

# Include local pirover library
from piroverlib import piRover

# Enable queue server
context = zmq.Context()
socket = context.socket(zmq.REP)
socket.bind("tcp://*:5555")

# Define pin numbers [A, B]
leftPins=[18,12]
rightPins=[13,19]

print("driveByQueue started")
pirover=piRover(left=leftPins, right=rightPins)
A ZMQ server object is created on the default port of 5555, then the left and right motor pin numbers are defined. A piRover object is then created. There is a loop following the above code snippet, which processes input and sends commands directly to piroverlib. These commands closely resemble the library functions described above:
| Command | Arguments | Function |
|---|---|---|
| stop | None | Stop |
| fwfull | speed, positive or negative integer | Both motors forward or reverse at full power |
| fwspeed | speed, -100 to 100 | Sets both motors to speed |
| chspeed | l, r | Value to change speed of left and right motor |
| drive | l, r | Set absolute values for left and right motor |
| js | x,y values between -100 and 100 | Send x and y joystick values |
| spin | speed, -100 to 100 | Spin clockwise (positive) or anti-clockwise at given speed |
| getsens | None | Return all sensor data |
| quit | None | Quit the server |
Each command will return the latest motor and sensor data as a JSON object.
Two programs are used for testing the driving queue, manualClient.py and keyboardClient.py. The manualClient.py program takes commands and sends them straight to the queue. Invalid commands will be rejected and it doesn’t give quick dynamic control, but it does give a way of testing any command as the queue processor and hardware libraries grow.
keyboardClient.py uses the python getkey library. W and S will speed up and down by 10%, with negative speed going backwards. To steer left, A drops the left motor speed by 10%, making the right motor faster. D does the opposite to turn right. The downside with this method of control is the robot gets progressively slower unless you keep tapping up the speed. An alternate method might be to take 5% off one motor and add 5% to the other, though this will make turning less sharp at full speed.
Browser control
Browser Install
To control the robot from a browser, we need to install a light weight web server. Lighttpd is perfect for this. It can also run CGI scripts based on button presses. To get started:
sudo apt install lighttpd- If we now browse to the Pi, we should get a 403 Forbidden error, e.g. http://pirover.local
- We want to keep web files local to the github repository, so there is a www/html and a www/cgi-bin directory included, or create these manually.
- Edit /etc/lighttpd/lighttpd.conf as root
- server.document-root = “/home/pi/Pi-rover-robot/www/html”
- Restart with
/etc/init.d/lighttpd restart - In www/html, create a very basic document, testPage.html:
<html><body>Hello World</body></html>
- Browse to your new page
- Now enable python cgi scripts with:
sudo lighty-enable-mod cgi fastcgi- Edit /etc/lighttpd/conf-enabled/10-cgi.conf to read:
# /usr/share/doc/lighttpd/cgi.txt

server.modules += ( "mod_cgi" )

$HTTP["url"] =~ "^/cgi-bin/" {
	cgi.assign = ( ".py" => "/usr/bin/python" )
	alias.url += ( "/cgi-bin/" => "/home/pi/Pi-rover-robot/www/cgi-bin/" )
}- In www/cgi-bin, place the following basic python file, called pycgiTest.py:
print ("Content-Type: text/html\n\n")
print ("<html><body>Python CGI!</body></html>")- Browse to http://pirover.local/cgi-bin/pycgiTest.py and we should see our test message.
A HTML page will display the main driving output, but calls to python scripts in the cgi-bin will be used to execute python commands, which will put driving messages on the queue.
Control by web page
Under keyboard control, we had keys for forward, backwards, left, right, stop and rotate in either direction. It worked quite well, so we can do the same from a web page. We can split this into two sections, one to display the streamed data and one as a button panel. An alternate control method would be to embrace direct ‘tank’ control and only give the options of speed up and speed down for the left and right motors.
In the www directory, webctl (http://pirover.local/webctl.html) is a simple HTML page with a number of buttons. Each button activates a javascript script, which calls cgi-bin/webToQueue.py. This takes the argument supplied and places it on the queue. This is picked up by driveByQueue and the rover starts to drive.
Not the prettiest of interfaces, but it gives robot eye view remote driving. Note, you need to manually start the streamer and driveByQueue.py before this web page will work.
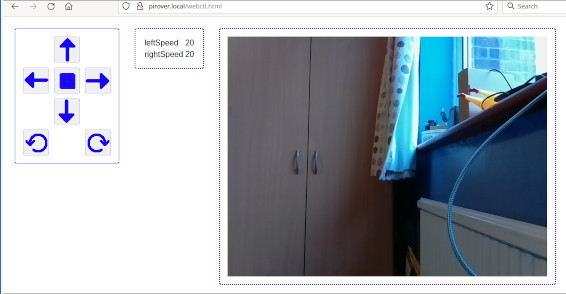
The returned JSON data containing sensor and performance data is displayed in the middle panel. As the development adds more sensors and functions, the increased data should still display. More advanced code would improve the looks, but this is a start.
Monitoring performance
The above web interface is fun and can be used to drive the rover surprisingly well. However at times I found there was quite a bit of lag on the web stream update. Is this load? Is it wireless strength? I expanded the main library, piroverlib.py to have three new functions:
- readLoad() – Uses the function call os.getloadavg() to return the current system load.
- readWifi() – Returns the current wifi signal and noise data.
- getSensorData() – Will read values from all defined sensors in the internal ‘rdata’ array
The rdata array contains data to return. Initially this is the left and the right motor speed. When a new piRover object is created, it can be called as:
pirover=piRover(left=leftPins, right=rightPins, load=1, wifi=1)With load and wifi set to 1, their return data is added to rdata. When getSensorData() is called, it runs through this list and when it finds the key ‘load’ defined, it will add the value for load. The same will be returned for wifi. Using this method we can dynamically add the distance sensors later. If they are not defined when the piRover object is created, they will be ignored. However if they are defined, the current distance will be returned each time. But it may not be efficient to return all sensor output in one go if you want to react quickly to one aspect of the environment changing, so you can still call functions such as readLoad() directly.
Summary
I now have a robot rover that can be driven remotely, so long as it is in range of wireless. It does suffer from some streaming performance issues which could be load or wireless signal. To be investigated. However what I did find was the free camera mount that came with my camera pointed upwards. This prevented the rover being able to see objects close in front of it. I’ll address this in part 4.