All code referred to in this post can be found in the Github repository.
In part 1, I got a basic functioning robot. The next step is to see how the driving performs. The long term aim is to make an autonomous robot, but for testing it helps if we can drive this ourselves – and it is fun. One method of remote control is to use the Blue Dot app for Android. But first lets look at the camera. As we have a front mounted camera, we can make use of this to give us the rover-eye-view and drive it remotely (so long as we stay in Bluetooth range).
Camera Streaming
A good streaming application I’ve used a few times is MJPG Streamer. Follow the build instructions then:
- Perform a first test from the build directory with
./mjpg_streamer -o "output_http.so -w ./www" -i "input_raspicam.so" - Visit your Pi with a URL similar to http://pirover.local:8080
- Click Stream to see the live stream
- A lower resolution may give a faster more responsive stream. We should also use the installed www path.
mjpg_streamer -o "output_http.so -w /usr/local/share/mjpg-streamer/www" -i "input_raspicam.so -x 640 -y 480 -fps=10"- As well as the resolution, I have set the frame rate to 10 FPS, the default is 5. This does make it a bit more responsive.
- Full documentation of all the Pi options are available at input_raspicam
- Depending on how your camera is mounted, you may wish to perform horizontal or vertical flips (-hf, -vf)
- Ctrl-c does not cleanly quit the streamer. I have found a killall is the most effective way
- There is a start and stop script in the bin directory of the Github repository, call with
streamer.sh start|stop - If you just want to view the stream, use the URL http://pirover.local:8080/?action=stream, using your own hostname.
Blue Dot Control
Blue Dot is a great little app for putting together a basic phone interface and using it to directly control a Raspberry Pi. In it’s most basic form it shows one large blue dot that can act as a simple button, but by reading the location of a finger press, it can behave like a joystick. There are install instructions at the Blue Dot homepage. Note that Blue Dot does not support python 2, but so far that is the version I’ve been using as it is the default (python --version). I needed to move my default to python 3, which is probably a good idea anyway.
ls -l /usr/bin/python- This likely points to /usr/bin/python2
ls -l /usr/bin/python3- This should point to the latest python 3 version
sudo update-alternatives --install /usr/bin/python python /usr/bin/python3 1python --versionsudo apt install python3-pipsudo pip3 install bluedot- Follow the example steps on the Blue Dot getting started page (link above)
- Pay particular attention to the page on pairing
- Scripts using Blue Dot, must be run as root (sudo)
Once the basic test in the instructions have been completed, hw_testing/bluedotJS.py continually reads presses on the dot, and returns the x,y values. These range between -1 and 1, to a number of decimal places. However for our driving application, we want both the motors to spin at 100 when fully forward. jsMap() translates these floats to integers ranging from -100 to 100.
Driving with Blue Dot
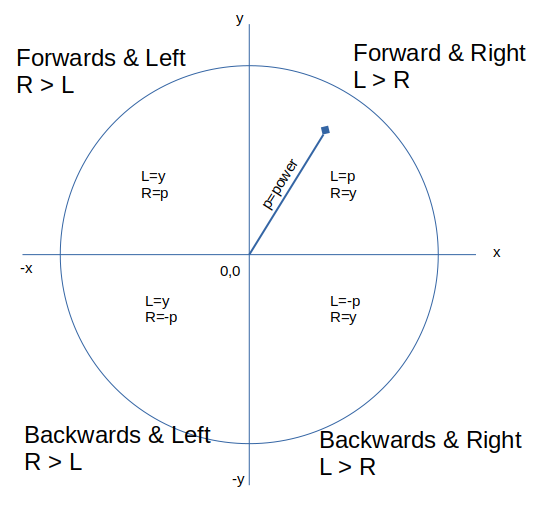
Expanding on the test script above driveTest2.py uses Blue Dot as a joystick to move the robot. A joystick does not naturally map to a robot driven by a left and right side (differential drive or tank drive) so we need to make a few decisions. First, the distance the finger is from the middle determines the power. We can use Pythagoras theorem on the x and y values to calculate a power ‘p’. For the individual motor powers, we can split the joystick into 4 sections. If we are going forward and right, we need the left motor to go faster than the right motor. We can set the left value equal to the calculated power and the right motor equal to the y value. When going backwards, we use negative power but can still use the y value as this will be returned as negative, putting both motors backwards.
The diagram below describes what we are trying to achieve. If the joystick is straight up, p will be calculated at 100 and used as the power for the left motor. Because y will also be 100 and used for the right motor power, we will go straight ahead. As we move the joystick round to the right, the value for y decreases, and so does the power for the right motor, turning us left.

We use the same motor control class as used in driveTest1.py and feed it values from Blue Dot.
As you can have more than one dot, driveTest2.py also has two red dots to turn the robot in a anti-clockwise or clockwise spin. This is achieved by putting one motor forward and the same backwards at the same power.
Driving Performance
Testing this, I found it was watchable on the screen, but the rover soon moved out of Bluetooth range of my phone. However it did work as a good remote if I followed it. Inside it drives well and the 4 wheel drive allowed it to move comfortably over various obstacles. However on carpet it juddered a lot when spinning, due to too much friction. On a smooth floor it spun really well. It also performed well outside on grass, coping with the various uneven surfaces.
Comments