A LCD screen is a great way to give more feedback to a user, either for a text message or values back from a sensor. Known as a 1602 LCD, this common display gives two rows of 16 characters to work with, and can scroll text. However it comes with two issues for the Micro:bit. First is that it needs 5v input and the second is it uses a lot of pins.
The first problem can be overcome by using an external power supply. The Micro:bit can only supply 3.3v. If you try powering a LCD screen from this, it will light up but if you can see anything at all, it will be very faint. There are a number of ways to supply 5v, one of the easiest is using a ‘3.3v 5v breadboard power supply module’. One of these comes with the Elegoo 37 sensor kit, but searching for the above description will find a number of other suppliers. These are usually quite cheap.
Supply the board with anywhere between 6.5v and 12v. A 5v and 3.3v will be supplied by the power output pins.
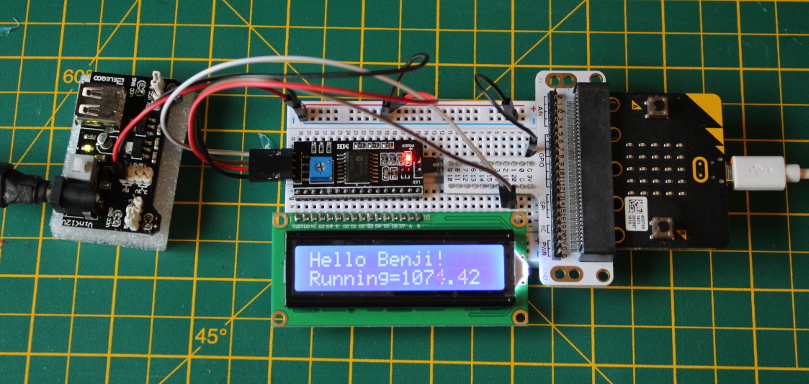
The second issue was the amount of pins used by the LCD module. The LCD requires 16 pins. While some of these are for power, plugging directly into the Micro:bit will not leave many free pins for other hardware. The easiest solution is to buy a I2C LCD module, pictured above the screen in the title image. To buy one, search for “I2C 1602 LCD”. You will often find screens with these already fitted.
Wiring it up
If you screen or your module has female headers, you can plug the module directly into the back of the screen. In the picture above, both the screen and the I2C module had male headers. Plug these into breadboard making sure the left most pin on the LCD (often marked ‘1’) lines up with the pin on the left of the module when it has it’s four pins on the side pointing out to the left.
From the power supply module, connect a 5v pin to Vcc on the I2C module and connect Gnd to a ground strip on the breadboard. You must connect this to Gnd on the Micro:bit. If you wish, you can connect a 3.3v pin from the power supply board to the 3v pin on the Micro:bit to power it, or you can power it via a serial cable.
The LCD interface module uses I2C, which is a common protocol that can be used to reduce connecting various modules to two wires each. So long as the devices have different addresses (don’t worry about this for now), you can connect multiple devices to I2C. The Micro:bit has two I2C pins to support this, 19 and 20. Connect SDA on the LCD module to pin 20 and SCL to pin 19.
Displaying text in your code
At the time of writing, there does not appear to be a common I2C LCD library, however ‘shaoziyang‘ has produced on at github, which works quite nicely (Thank you!).
The following code displays a hello message (to our dog) and counts up the seconds the Micro:bit has been running. If this does not work first time, check your wiring but also try changing LCD_I2C_ADDR from 63 to 39. Some modules use a different address:
from microbit import *
import time

LCD_I2C_ADDR=63

class LCD1620():
    def __init__(self):
        self.buf = bytearray(1)
        self.BK = 0x08
        self.RS = 0x00
        self.E = 0x04
        self.setcmd(0x33)
        sleep(5)
        self.send(0x30)
        sleep(5)
        self.send(0x20)
        sleep(5)
        self.setcmd(0x28)
        self.setcmd(0x0C)
        self.setcmd(0x06)
        self.setcmd(0x01)
        self.version='1.0'

    def setReg(self, dat):
        self.buf[0] = dat
        i2c.write(LCD_I2C_ADDR, self.buf)
        sleep(1)

    def send(self, dat):
        d=dat&0xF0
        d|=self.BK
        d|=self.RS
        self.setReg(d)
        self.setReg(d|0x04)
        self.setReg(d)

    def setcmd(self, cmd):
        self.RS=0
        self.send(cmd)
        self.send(cmd<<4)

    def setdat(self, dat):
        self.RS=1
        self.send(dat)
        self.send(dat<<4)

    def clear(self):
        self.setcmd(1)

    def backlight(self, on):
        if on:
            self.BK=0x08
        else:
            self.BK=0
        self.setdat(0)

    def on(self):
        self.setcmd(0x0C)

    def off(self):
        self.setcmd(0x08)

    def char(self, ch, x=-1, y=0):
        if x>=0:
            a=0x80
            if y>0:
                a=0xC0
            a+=x
            self.setcmd(a)
        self.setdat(ch)

    def puts(self, s, x=0, y=0):
        if len(s)>0:
            self.char(ord(s[0]),x,y)
            for i in range(1, len(s)):
                self.char(ord(s[i]))

lcd = LCD1620()
lcd.puts("Hello Benji!")
while True:
    lcd.puts("Running=" + str(running_time()/1000), 0, 1)
    sleep(500)
Functions in the library
| Function | Usage |
| clear() | Clears the display |
| backlight(0 or 1) | Setting the backlight to 0 turns the backlight off, 1 turns it back on again. |
| off() | Turns the LCD off, thought the backlight stays on |
| on() | Turns the LCD on |
| char(c,x,y) char(65,x,y) char(ord(‘@’),x,y) | Prints a single character at coordinates x,y Prints the ASCII value 65 (capital A) at coordinates x,y Using ord, prints @ at coordinates x,y |
| puts(s,x,y) puts(“Hello World”, 0,1) | Writes a text string at coordinates x,y Writes “Hello World” at the start of the second line. |