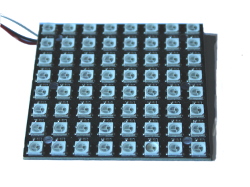
NeoPixels are Adafruit’s brand of individually addressable RGB LEDs. However the name has become common use to describe most kinds of WS2812 (and similar) LED arrays. Each LED can have it’s colour set individually using a RGB value. This can lead to interesting light and animation displays. The above image is not an Adafruit branded matrix, it was cheaper and has one ‘stuck’ LED. Adafruit’s offerings are generally considered to be higher quality. For this article, all similar arrays will be referred to as Neopixels.
Neopixels can come in a large range of shapes and sizes, rings, strips, arrays, long strings or as individuals. They come with 3 connections, Vcc (3v), GND and Data/IN. Data connects to any pin which supports PWM. It is not clear from the docs if all pins support PWM, though pins 0-3 certainly do. Most units also have output connections for power and data, allowing you to daisy chain units together for large LED displays. Chaining more units together may require the use of external power supplies.
Micropython has a Neopixel library, which has 2-3 simple steps:
- Clear the display (optional)
- Configure colour values for each pixel
- ‘Show’ the display.
The following code clears the display, then sets the first three pixels to be red, green and blue. Like most things in computing, counting starts at zero not one:
# NeoPixel Demo
from microbit import *
import neopixel

# Init a 64 Neopixel display on Pin0
np = neopixel.NeoPixel(pin0, 64)

# Clear the display
np.clear()

# Set the first pixel to red
np[0] = (255, 0, 0)
# Set the second pixel to green
np[1] = (0, 255, 0)
# Set the third pixel to blue
np[2] = (0, 0, 255)

# Show new display settings
np.show()
This version of the neopixel library does not allow the adjustment of brightness. The only supported method is to lower the RGB values. Adafruit does have a library which does allow brightness lowering.
Pixel numbering
Different Neopixel shapes have different numbering schemes to determine how your pixels are laid out, the following code will flash each pixel in turn:
# NeoPixel Demo
from microbit import *
import neopixel

# Init a 64 Neopixel display on Pin0
np = neopixel.NeoPixel(pin0, 64)

for i in range(64):
    # Clear the display
    np.clear()

    # Set the pixel to red
    np[i] = (64, 0, 0)

    # Show new display settings
    np.show()
    sleep(300)
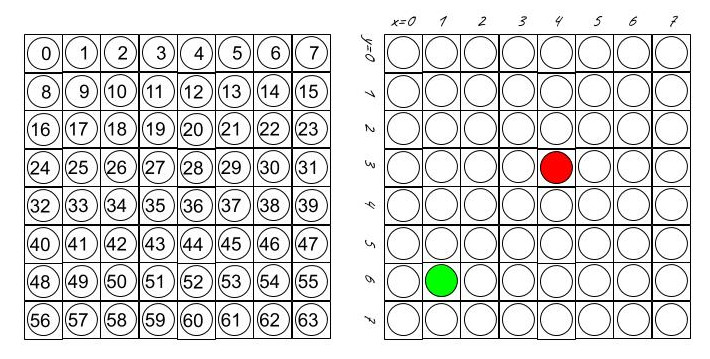
From this, I could determine the layout on the left of the below image for my 8×8 matrix.

It would be more useful if we could address the pixels using coordinates as demonstrated on the right, especially if we want to do an animation or move a cursor. The red pixel has the coordinates (4,3), pixel number 28. The green pixel is (1,6), pixel 49. The formula p=8*y + x can be used to calculate the pixel number. If we wrap this up in a function, we can address our pixels using coordinates. The following code displays the red and green pixel in the right image.
# NeoPixel Demo
from microbit import *
import neopixel

# Init a 64 Neopixel display on Pin0
np = neopixel.NeoPixel(pin0, 64)

# Function neoCoord
def neoCoord(n, x, y, col):
    # Accept a neopixel object, x and y values then set the pixel to be that colour
    # Calculate pixel number
    p = y*8 + x

    # Set the pixel
    n[p]=col

# Set red and green pixels by coordinate
# Clear the display
np.clear()

neoCoord(np, 4, 3, (128,0,0))
neoCoord(np, 1, 6, (0,128,0))

# Show new display settings
np.show()
You may need to write your own formula in neoCoord depending on your display. It may be rectangular or you could join two 4×4 displays together to make a 8×4 display.
Displaying Images
The onboard LEDs can be sent an image to display, either using a pre-defined image or defining your own. See the tutorial here. Wouldn’t it be nice if we could do the same? With large displays we could use images smaller than the overall display. We tell it where we want the image to appear, what colour and what image. If we define this is a binary bitmap (using 0 and 1 only) and code correctly, we need not worry if the image goes off the ‘screen’. We can use this to produce nice animation effects and call the function multiple times with different colours to produce multi-colour images.
neoImage takes a Image object and prints it in the colour col, at the coordinates specified. It is happy if that prints part of the image (including the starting point) off the screen, as this allows images to scroll on and off the screen. Use negative coordinates to go off the top or left of the screen. The following code includes the image displaying function neoImage along with a short bit of code to scroll a TIE fighter across the screen twice.
# Neopixel Images
from microbit import *
import neopixel

# Init a 64 Neopixel display on Pin0
np = neopixel.NeoPixel(pin0, 64)

# Set the display width and height. We need this for correctly
# displaying images
dwidth = 8
dheight = 8

tie = Image("10001:"
            "10101:"
            "11111:"
            "10101:"
            "10001")

# Function neoCoord
def neoCoord(n, x, y, col):
    # Accept a neopixel object, x and y values then set the pixel to be that colour
    # Calculate pixel number
    p = y*8 + x

    # Set the pixel
    n[p]=col

# Display an image on a neoPixel matrix
def neoImage(n, px, py, col, img):
    # n=NeoPixel object, px & py=top left positional coordinates,
    # col=colour and img is a binary image object
    # The position may be negative to allow an image to scroll onto
    # the screen

    # Find dimensions
    w = img.width()
    h = img.height()

    # Set coordinates to start plotting (x and y)
    x = px
    y = py

    # Run through each row of the image as iy (image y)
    for iy in range(h):
        # Run through each column in the image as ix (image x)
        # Reset x to start of row
        x = px
        for ix in range(w):
            # Find the value of that pixel
            v = img.get_pixel(ix, iy)
            if(v > 0):
                # Check the pixel is in the range of the screen
                # If not, ignore
                if(x >= 0 and y >= 0 and x < dwidth and y < dheight):
                    # Set that pixel
                    neoCoord(n, x, y, col)

            # Increase x
            x = x + 1

        # Move to the next row
        y = y + 1


# Scroll the image onto the top left and across the screen
for i in range(-5,9):
    # Clear the display
    np.clear()

    # Display the image
    neoImage(np, i, 0, (0,0,80), tie)

    # Show new display settings
    np.show()

    # Pause
    sleep(200)

# Scroll back on the from the other side at the bottom
for i in range(9,-6,-1):
    # Clear the display
    np.clear()

    # Display the image
    neoImage(np, i, 3, (0,0,80), tie)

    # Show new display settings
    np.show()

    # Pause
    sleep(200)